Installing MasterPress
Downloading the Plugin
If you haven’t already done so, you’ll need to first download the latest zip file package from the Downloads section of the MasterPress support area. Note that you’ll need to be a valid licence holder to access the plugin download.
Note: this installation guide assumes that your user account has the capability to manage_options in your current WordPress site. If someone else has setup WordPress for you, this may not be the case, and some screens referred to in this guide may not be accessible. Contact the person who installed WordPress if you cannot access everything in this guide.
Installing via Upload
Provided your WordPress installation can support this method, this will be the fastest way to install the plugin, since MasterPress is a rather large plugin containing a lot of files.
1. Access the Plugins Menu
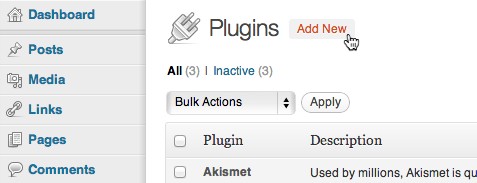
From the WordPress dashboard, access the Plugins menu:

2. Select “Add New”
Press the “Add New” button at the top of the screen
3. Select the “Upload” section
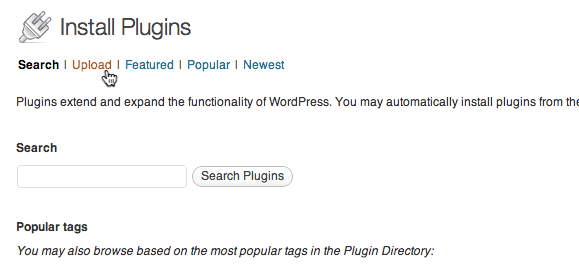
Select the “Upload” link from the list of sections at the top of the page
4. Select the plugin file from your computer
Use the upload control to choose the plugin zip file from your computer. Note: the screenshot shows this control on the Mac version of Chrome, but the wording and appearance of this may be different on other browsers and operating systems.
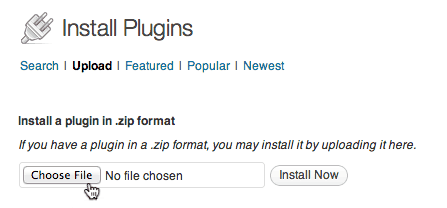
Now click the Install Now button.
If the upload fails at this point, you may need to increase the maximum file upload size for PHP. This post on the WordPress Stack Exchange may help you work through this issue. Alternatively, you can try to Install via FTP as per the instructions below.
5. Enter your FTP information
Although you are not installing via FTP, WordPress needs your FTP information to complete the installation. Enter this information in the fields provided.
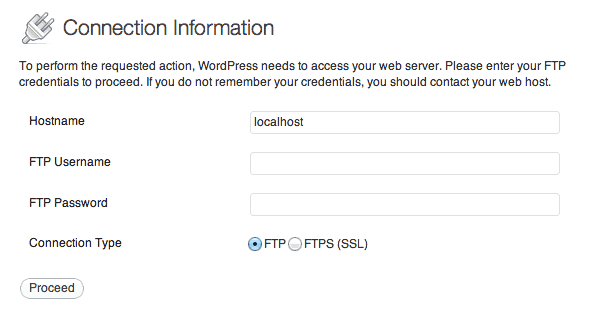
Now click “Proceed”, and WordPress will proceed with the installation. If everything goes well, you should see something like the following screen:

There are a number of reasons why this step may fail which are beyond the scope of this guide. Please consult the WordPress guide to managing plugins if you’re having trouble.
6. Activate the Plugin
The plug-in is now installed but not yet active. Click “Activate Plugin” to enable MasterPress. If the plug-in is successfully enabled, you should now see the “Masterplan” menu towards the bottom of the main dashboard menu:
![]()
Installing via FTP
The most reliable way to install the plugin is via an FTP program on your computer. If you don’t have an FTP program, FileZilla is a free FTP program available for the Windows, Mac, and Linux platforms.
1. Unzip the plug-in file.
Before installing the plug-in you will need to first unzip the plug-in zip file – once unzipped, you should have a folder called “masterpress”.
MasterPress is a large plugin which contains a lot of files. If you know your way around your hosting control panel, it will be much quicker to upload the zip file and then extract it via your hosting panel’s file manager. Specific instructions for this are beyond the scope of this guide, as there are many different hosting setups.
2. Connect to your WordPress site via FTP
Using your FTP program, enter your FTP connection information and browse to the top level of your WordPress site. The folder you need will contain other folders such as “wp-content”, “wp-admin”, and “wp-includes” folders, and a number of files related to your WordPress installation.
If you do not know your FTP connection information, or where your WordPress site is installed, you may need to contact your hosting provider or the person(s) who setup your site initially.
2. Browse to the wp-content/plugins folder
Use your FTP program to access the wp-content folder (in most programs this is usually via a double click), then the plugins folder.
3. Upload the masterpress folder
Drag the masterpress folder from your computer into the plugins folder on the server, and wait until the upload has completed.
Note: this may take a while to complete, as MasterPress contains a lot of files.
4. Activate the plugin
Now access the plugins section in the WordPress dashboard:

If MasterPress is installed correctly, you should now see it in the list of installed plugins:
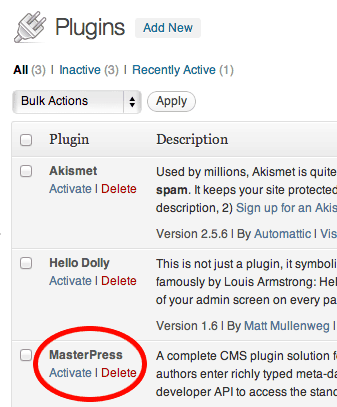
Click “Activate” to enable MasterPress. If the plug-in is successfully enabled, you should now see the “Masterplan” menu towards the bottom of the main dashboard menu:
![]()